
A professional email address needs two things: a domain name you own and an email host to run it through. Once those are in place, you can be sending from your branded inbox the same day. Hands-on setup usually takes a short amount of time, with DNS propagation usually completes quickly but can sometimes take longer
Before you start, gather:
- Your domain name (or be ready to register one)
- Admin login for your domain registrar
- A shortlist of mailboxes and aliases you'll need
- A spare personal inbox to test with
Budget a modest monthly amount per user for most providers, and switch on two-factor authentication plus SPF, DKIM and DMARC from day one. Skip these and you're leaving your business exposed to spoofing before you've sent a single invoice.
Key Takeaways
A professional email address setup requires only a domain and an email host, and most small businesses can complete it within an hour.
| Point | Details |
|---|---|
| Two requirements only | You need a custom domain plus an email host; everything else builds on those two. |
| Time and cost | Hands-on setup takes 15 to 30 minutes, plus DNS propagation of up to an hour, for roughly £4 to £12 per user monthly. |
| Authentication is non-optional | Publish SPF, DKIM and DMARC and enable two-factor authentication before announcing your new address. |
| Use aliases to cut cost | Role addresses like sales@ or support@ can forward into one paid mailbox instead of needing separate subscriptions. |
| Ace-sites for the website side | Ace-sites gets a branded website live quickly, with SEO tools built in, giving your new email address somewhere to point people. |
Table of Contents
- Checklist: what to gather before you begin
- Step-by-step business email configuration
- How to choose the right email host or service
- What do MX, SPF, DKIM and DMARC records actually do?
- Choosing a professional email format that scales
- Enable two-factor authentication and mailbox hygiene
- Connecting Outlook, Apple Mail and mobile devices
- Fixing spam, DNS delays and connection errors
- How aceSites supports domain and email setup for small businesses
- The simplest route for most small businesses
- Get your domain and website live while you sort your email
- Sources
Checklist: what to gather before you begin
Tick these off first and the actual setup becomes almost mechanical.
- Confirm you own a domain, or pick one and register it (do this before anything else).
- Decide how many people need a full mailbox versus a forwarding alias.
- Have your registrar login and hosting admin details open in a browser tab.
- Set up a spare personal inbox purely for sending test emails.
- Decide whether you need a privacy-focused provider or a general workspace suite.
Pro Tip: Write down every address you think you'll need (info@, you@, sales@) before you sign up to a plan. Providers price per mailbox, so knowing your real number first stops you overpaying for accounts you'll never touch.
Step-by-step business email configuration
This is the order that avoids the most common hold-ups: registering DNS records before your provider has actually generated them.
1. Register or confirm your domain. If you don't already own one, buy it through a registrar such as GoDaddy, Namecheap, or Cloudflare Registrar. Keep the domain and the email hosting separate if you like flexibility. Owning the domain outright, rather than borrowing a subdomain from a free platform, is what makes the difference to how customers perceive you. Generic, non-branded addresses often get read as less trustworthy, even when the business behind them is entirely legitimate.
2. Sign up to an email host and add your domain. Whether you choose a full workspace suite, a website builder's bundled email, or a privacy-first provider, the process is similar: you enter your domain, and the provider generates a set of DNS records specific to your setup.
3. Copy the DNS values into your registrar. This is the fiddly bit, but it's just data entry. You'll typically add:
- An MX record pointing incoming mail to your provider's servers
- A TXT record for SPF, authorising which servers can send mail on your behalf
- A TXT record for DKIM, containing a public key tied to a specific selector
- A TXT record for DMARC, telling receiving servers what to do with mail that fails checks
If your domain sits behind Cloudflare, make sure any MX record stays set to "DNS only" rather than proxied. A proxied MX record simply won't route mail, and it's one of the most common reasons a new setup fails silently on day one.
4. Create your mailboxes and aliases. Set up your primary addresses, add forwarding aliases for anything role-based, and enable two-factor authentication for every account before you do anything else. Choose strong, unique passwords, ideally generated and stored in a password manager rather than typed from memory.

5. Test delivery both ways. Send a message to your new address from your personal test inbox, and send one back. Open the full headers on the received message and look for three lines: spf=pass, dkim=pass, and dmarc=pass. If any of them fail, the DNS record for that check hasn't published correctly yet, or has a typo. Give it time; propagation is usually quick but isn't instant.
Most small businesses can complete all five steps within an hour, then simply wait for DNS to catch up.
How to choose the right email host or service
Three broad categories cover almost every small business:
- Workspace suites (like the major providers behind Gmail-for-business or Outlook-for-business) bundle email with calendars, file storage, and video calls. Good if your team already lives in one ecosystem. These suites also come with admin controls and enterprise-grade security tooling that a bare email account won't offer.
- Website builder or web host email ties your inbox to your hosting plan, often at a lower incremental cost, sometimes bundled free with a site subscription. Handy if you're already paying for hosting anyway.
- Privacy-focused providers emphasise end-to-end encryption and limit how much the provider itself can see of your messages. Worth considering if you handle sensitive client data, though for most small businesses a standard workspace plan is perfectly adequate.
Decide based on: how many people need access, how much storage each person actually uses, whether you need built-in migration tools, and how much hand-holding you want during DNS setup.
One genuinely useful cost lever: use aliases instead of paid mailboxes wherever you can. An alias simply forwards mail into an existing mailbox at no extra charge, while a separate mailbox usually adds another line to your monthly bill. A sole trader with one paid mailbox and three aliases (info@, sales@, support@, all forwarding to the same inbox) looks exactly as professional as a business paying for four separate accounts.
Expect to pay a range of monthly fees per user depending on plan level
What do MX, SPF, DKIM and DMARC records actually do?
Four DNS records do the real work of email authentication, and skipping any of them is the single most common reason new business email gets flagged as spam.
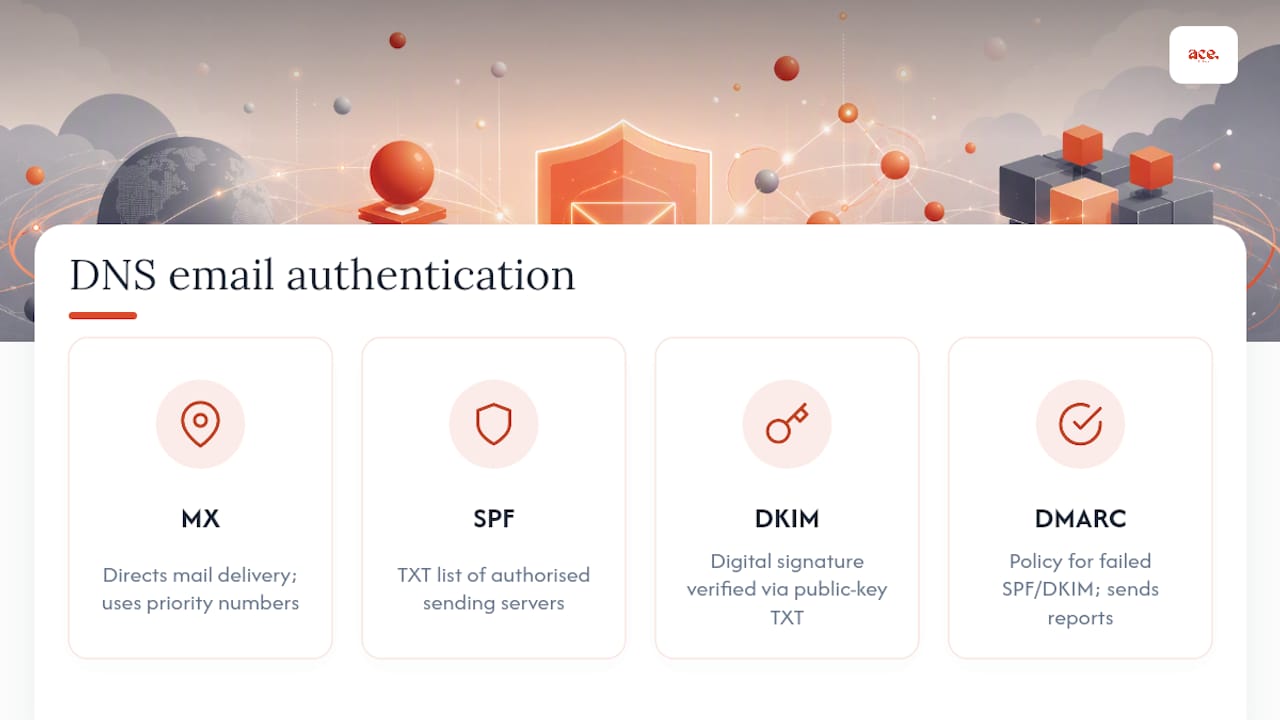
MX records tell the internet where to deliver mail addressed to your domain. Each one carries a priority number; lower numbers get tried first. Your provider gives you the exact values, you paste them into your registrar's DNS panel, and that's the whole job.
SPF (Sender Policy Framework) is a TXT record listing which servers are allowed to send mail as your domain. A basic SPF record might authorise just your email provider, but if you also send through a marketing platform or a support ticketing tool, each one needs including. List too many services carelessly and you can hit SPF's lookup limits, so for anything beyond two or three senders, check your provider's guidance on avoiding an overloaded record.
DKIM (DomainKeys Identified Mail) attaches a digital signature to outgoing messages, verified against a public key published as a TXT record under a specific selector your provider assigns. It's the piece that proves a message genuinely came from your server and wasn't altered in transit.
DMARC tells receiving mail servers what to do when SPF or DKIM checks fail. A cautious starting policy simply asks for reports without rejecting mail outright, letting you monitor for problems before tightening enforcement. Security guidance consistently ranks these three records, alongside two-factor authentication, as the strongest available defence against phishing and spoofing.
Once published, verify everything with a free online DNS lookup tool or an inbox tester, and recheck after sending a real test message to confirm all three authentication checks come back as passes.
Choosing a professional email format that scales
Get your naming convention right now, because changing it later means reprinting cards and re-training customers.
- firstname.lastname@yourdomain.com looks the most formal and scales cleanly as you hire, though it's a longer string to type or say aloud.
- firstname@yourdomain.com feels warmer and works well for solo founders and very small teams, but runs out of road once two colleagues share a first name.
- initiallastname@yourdomain.com (jsmith@) is compact and common in larger organisations, though slightly less personal for client-facing roles.
- Role-based addresses like sales@, support@, or hello@ should be set up as aliases forwarding to whoever currently owns that responsibility, so the address survives staff changes without customers ever noticing.
Avoid nicknames, numbers tacked on for uniqueness, and anything longer than it needs to be. If a customer has to ask you to repeat your email address on the phone, it's already failing its one job.
Enable two-factor authentication and mailbox hygiene
Two security decisions matter more than everything else combined: turning on 2FA and getting SPF, DKIM and DMARC right. Two-factor authentication is widely regarded as the single most effective step a small business can take to protect a business inbox, because it stops a leaked password alone from being enough to break in.
Beyond that first layer:
- Use a password manager to generate and store unique, long passwords for every mailbox, never reused elsewhere.
- Where your provider offers passkeys instead of passwords, switch to them; they remove the password entirely as an attack surface.
- Rotate credentials immediately after any suspected compromise, including for staff who leave the business.
- Check your provider's DMARC aggregate reports periodically. They quietly tell you who's sending mail claiming to be your domain, including anyone spoofing you.
- Watch bounce rates and spam complaints. A sudden spike usually means an authentication record has broken or a mailbox has been compromised and is sending spam.
Pro Tip: Set a calendar reminder to check your DMARC reports monthly. Most business owners set these records up once and never look again, missing early warning signs of spoofing attempts against their own domain.
Connecting Outlook, Apple Mail and mobile devices
Most modern providers offer one-click auto-setup for Outlook, Apple Mail, and mobile devices, and it's worth trying that first before touching manual settings.
- Open your mail app and choose "add account," entering your full email address and password.
- If auto-setup fails, switch to manual configuration using IMAP rather than the older POP3 protocol, so mail stays in sync across every device.
- Enter IMAP on port 993 with SSL enabled, and SMTP on port 587 with STARTTLS for outgoing mail.
- If the connection still fails, double-check you've entered the complete email address as the username, not just the part before the @ symbol.
- Enable calendar and contact sync if your provider bundles it, so your phone and desktop stay aligned automatically.
Fixing spam, DNS delays and connection errors
If messages land in spam, check SPF, DKIM and DMARC are all publishing correctly, then send a test through an inbox checker to confirm what's actually failing. A missing or misconfigured DMARC record is the usual culprit.
- DNS not updating? Give it up to an hour in most cases; use an online DNS lookup tool to confirm the record has actually published before assuming it's broken.
- Client won't connect? Confirm you've used the full email address as the username, and that ports match exactly (993 for IMAP, 587 for SMTP).
- Before calling support, have your domain name, the exact error message, and a screenshot of your current DNS records ready. It saves an entire back-and-forth.
How aceSites supports domain and email setup for small businesses
Getting a business online shouldn't mean wrestling with DNS panels for a weekend. The businesses that move fastest are the ones with someone showing them exactly where each record goes.
Ace-sites was built around that idea: get local businesses live quickly, without needing technical expertise to do it.
- Rapid deployment, with sites able to go live in under a day
- Built-in SEO tools that work alongside your new branded email
- A straightforward platform that doesn't assume any DNS knowledge
- Guides covering related setup steps, including choosing a business domain name and setting up a Google Business Profile
The simplest route for most small businesses
Most small businesses do best pairing a custom domain with either a standard workspace suite or a website bundle that includes email. It's the option with the fewest moving parts and the lowest chance of something going quietly wrong.
DIY setup makes sense if you're comfortable copying DNS values without second-guessing yourself. If DNS panels make your eyes glaze over, paying someone an hour of their time is cheaper than the days lost to a broken MX record.
Whichever route you take, enable 2FA and send test messages both ways before you print a single business card with your new address on it.
Get your domain and website live while you sort your email
Registering a domain and untangling DNS records is only half the job. The other half is having somewhere for that professional email to actually point people towards. Ace-sites is built for exactly that gap: a way to get a domain, a working website, and the DNS groundwork sorted without needing to become an expert in any of it first.
Ace-sites gets a small business site live in under a day, with built-in SEO tools already switched on and no hidden costs buried in the small print. If you'd rather someone else handled the domain, DNS, and design work entirely, the done-for-you build covers that from start to finish, and you only pay once you've seen the result. Prefer to build it yourself in minutes? Try the AI website builder and have a live site to point your new email address towards today.
Sources
- How to Set Up Business Email: Step-by-Step Guide (2026)
- Reasons a new business needs a professional email address (Network Solutions)
- Email alias vs mailbox: save costs by using aliases (Twilio blog)