
For most small businesses, you can add a working live chat to your website in under 15 minutes by using a SaaS embed or a CMS plugin. Choose based on your comfort with tech and how sensitive your customer data is: a SaaS embed suits anyone who wants speed and zero maintenance, while a CMS plugin suits WordPress, Shopify or Wix owners who want it baked into their existing dashboard.
Before you start, get these three things ready:
- A vendor account (or plugin from your site's app store)
- A place to paste the embed code, or plugin admin access
- At least one person who can actually answer chats when they come in
Key Takeaways
Most small businesses can have live chat running on their website quickly using a SaaS embed or CMS plugin, provided at least one responder is ready before launch.
| Point | Details |
|---|---|
| Choose your method first | Pick SaaS embed for speed, a plugin for CMS familiarity, or self-hosted only if compliance demands it. |
| Run the five-question audit | Check hosting, logged-in users, compliance, campaign tracking and lead routing before installing. |
| Configure before you publish | Set colours, welcome message, canned responses and business hours so chat feels human, not robotic. |
| Test before and after launch | Check anonymous and logged-in flows, mobile networks, UTM tracking and offline forms. |
| Track four core metrics | Watch first response time, chats per visitor, lead conversion and satisfaction scores weekly. |
| Consider a supported build | aceSites offers fast site creation with built-in tools, ready for chat embedding or app installation. |
Platform documentation and practical how-tos
For platform-specific setup steps, HubSpot's chatflow guide covers configuration and testing in detail, while Tidio's 11-step walkthrough handles CMS install paths. For embed security, Lodgestory's Web Chat docs explain allowed origins, and Salesforce's developer guidance covers secret rotation with a 24 hour overlap window to avoid downtime.
Table of Contents
- How to add live chat to your website: a step-by-step checklist
- How do you choose the right method for your site?
- Platform-specific install notes
- Configuring the widget so it actually converts
- Which integrations and metrics actually matter
- Testing and your 48-hour launch checklist
- How aceSites simplifies going live with chat
- Sources
How to add live chat to your website: a step-by-step checklist
Getting chat onto your site is less about coding and more about making a handful of decisions in the right order. Here's the sequence that gets a working widget live without a wasted afternoon.
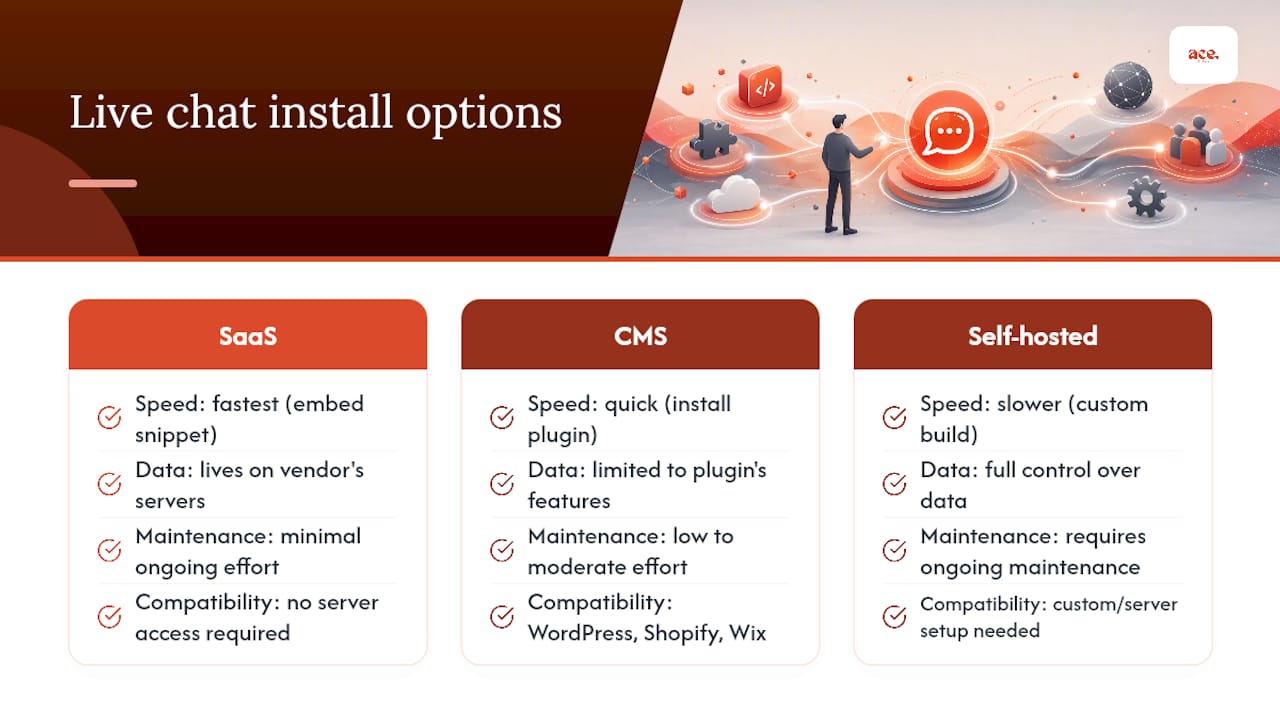
1. Pick your installation path. A SaaS embed (a snippet of code from a chat provider) is the fastest option and needs no server access, though your chat data lives on the vendor's servers. A CMS plugin plugs straight into WordPress, Shopify or Wix and often feels more native, but you're limited to whatever the plugin supports. A self-hosted or custom build gives you full control over data but demands ongoing maintenance most small businesses don't have time for.
2. Sign up and grab your snippet or plugin. SaaS providers give you a short piece of JavaScript after you create an account, usually inside a "install" or "get code" tab. Plugin routes mean searching your CMS's app marketplace, installing, and activating, no code required.
3. Paste the snippet or activate the plugin in the right spot. For a code snippet, it needs to sit right before the closing </body> tag on every page you want chat to appear. Most modern site builders and CMS platforms have a dedicated "custom code" or "header/footer scripts" area that handles this for you, so you rarely need to touch raw HTML. HubSpot's chatflow documentation walks through this exact configuration step by step, including how to preview before you publish.
4. Set the basics: name, colours, welcome message, pre-chat form. Give the widget a name that matches your brand voice, not the vendor's default. Pick a colour that stands out against your site background without clashing with your logo. Write a welcome message that sounds like a person, not a script, something like "Hiya, need help finding a service?" beats "How can I assist you today?" Decide whether you need a pre-chat form asking for name and email before the conversation starts.
5. Assign responders and set your hours. Decide who's answering, when, and what happens outside those hours. Even a solo trader can rotate chat duty with mobile notifications, but somebody has to own it.
Pro Tip: Test your welcome message out loud before you publish it. If it sounds like something a robot would say, rewrite it until it sounds like something you'd actually say to a customer walking through your door.
Tidio's 11-step walkthrough covers CMS-specific install paths in more depth if you want platform-by-platform detail, including code snippet placement quirks for less common builders.
How do you choose the right method for your site?
The method you pick should match your actual goals, not whichever tool has the flashiest homepage. A SaaS embed wins on speed and low maintenance: you sign up, paste one snippet, and you're live, with the vendor handling hosting, updates and uptime. Plugins and apps are the natural choice if you're already running WordPress, Shopify or Wix, since they slot into a dashboard you already know. Self-hosted setups give you full control over where chat data lives, which matters if you're in a regulated sector, but they cost you ongoing maintenance time that most small teams don't have spare.
Comparative reviews of live chat software point out that smaller businesses tend to do best with fast, simple tools rather than heavyweight platforms built for enterprise support teams, while mid-market operations with dedicated support staff often get more value from AI-native features.
Before you commit, run through five quick questions:
- What's your current hosting setup, and does it support custom code?
- Do most of your visitors browse logged in, or are they anonymous?
- Do you have compliance or data residency requirements to satisfy?
- Do you need campaign or UTM data to flow into each chat conversation?
- Where should new leads land, your CRM, your inbox, or a shared team channel?
A short stack audit like this before you install prevents most of the post-launch headaches small businesses run into with chat, from missing lead data to widgets that silently fail on mobile.
Platform-specific install notes
Where exactly you paste the snippet depends entirely on what your site runs on. Here's the practical breakdown for the platforms most small businesses actually use.
WordPress. You've got two routes: install a chat plugin from the WordPress repository and activate it (no code needed), or paste the vendor's snippet into your theme's footer.php file via the theme customiser. The plugin route is safer if you're not comfortable editing theme files, since a botched edit can break your whole site.
Shopify. Install a chat app from the Shopify App Store for the simplest path. If you'd rather use a direct embed, you'll need to edit theme.liquid and paste the snippet just before the closing </body> tag, which requires going into your theme's code editor.
Wix, Squarespace and similar builders. These platforms usually have a dedicated custom code or embed section built into the site editor, so you paste your snippet there rather than hunting for theme files. Many also have chat apps in their own marketplaces if you'd rather avoid code entirely.
Static HTML sites. Paste the snippet before </body> on every single page, or better, use a shared include file if your site setup supports one, so you only edit the code once. Watch out for caching: if your site sits behind a CDN or heavy caching layer, the widget can silently fail to load on cached pages until you clear the cache or exclude the script from caching rules.
Pro Tip: After installing on any platform, open your site in a private/incognito browser window. If the widget doesn't appear, caching is the most common culprit, not a broken snippet.
Configuring the widget so it actually converts
Getting chat installed is only half the job. How it looks and behaves determines whether visitors actually use it or click straight past.

Design choices matter more than most people expect. Your widget colour, avatar (a real photo beats a generic icon), position on the page, and the tone of your welcome message all signal whether a real person is on the other end. Pre-chat fields need a careful balance too: asking for name and email upfront captures leads, but every extra field you add loses you visitors who just wanted a quick answer.
Beyond the visual setup, a handful of operational settings do the heavy lifting once conversations start:
- Write five or six canned responses for your most common questions (pricing, availability, turnaround time)
- Set clear rules for when a bot hands a conversation to a human
- Define your business hours inside the widget settings, not just on your contact page
- Build an offline form so visitors outside your hours can still leave a message
To set expectations properly, follow this order:
- State your typical response time directly in the welcome message ("we usually reply within 2 minutes")
- Show an "away" status automatically outside business hours
- Route offline messages to email or your CRM so nothing gets lost
Getting this right is less about polish and more about honesty. A widget that promises instant replies and then goes silent for an hour does more damage to trust than not having chat at all.
Which integrations and metrics actually matter
Not every integration is worth the setup time, but a handful pay for themselves fast. Connecting chat to your CRM or email turns casual conversations into tracked leads instead of messages that vanish once the browser tab closes. Passing UTM and campaign parameters into each chat record matters too, since it tells you which ad or blog post actually drove that conversation, not just that "someone chatted."
Chatbots earn their place for repetitive questions (opening hours, pricing tiers, appointment booking) but should hand over to a human the moment a question gets specific or a visitor sounds frustrated. HubSpot's chat features show how targeting rules and automated replies can pull from a knowledge base before a human ever joins the thread. Install the agent mobile or desktop app for whoever's answering chats, since a five-minute delay because someone missed a browser notification is often the difference between a lead and a bounce.
Once it's running, track four numbers:
- First response time (aim under two minutes during business hours)
- Chats started per visitor (tells you if your prompt is too aggressive or too invisible)
- Lead conversion rate from chat conversations
- Customer satisfaction score after each conversation ends
Standard configuration advice across vendor documentation consistently flags operating hours and offline forms as the two settings that prevent the most missed leads, more than any automation feature.
Testing and your 48-hour launch checklist
Before you tell anyone the chat is live, run through this list:
- Open your site in a private browser window as an anonymous visitor and start a test chat
- If your site has logged-in users, test that flow separately, chat should show visitor context without exposing personal data in the browser, Tidio's guidance on identity passthrough covers this well
- Test on mobile data, not just office WiFi, and check at least two browsers
- Send a test message with UTM parameters attached and confirm it lands correctly in your CRM or inbox
- Trigger the offline state and confirm the form actually submits somewhere you'll see it
- Check that any post-chat survey fires correctly
For the first 48 hours after launch, keep a close eye on response times and be ready to add a second responder if chats come in faster than expected. Most problems surface in the first two days, not the first two weeks.
How aceSites simplifies going live with chat
If you'd rather skip the platform-hunting entirely, aceSites builds the underlying site fast enough that adding chat becomes a five-minute afterthought rather than a project. The AI builder generates a working, mobile-optimised site from a short brief, and the portfolio shows real small-business examples already running contact forms and booking widgets, the same building blocks chat integrates alongside.
Because aceSites includes built-in SEO tools and a blog manager as standard, you're not stitching plugins together to get a functional site before you even think about chat. For businesses who want it done rather than DIY, aceSites can embed a chat snippet or install an app as part of a supported build, so nothing sits half-finished.
Quick recommendation and realistic timeline
Start with a SaaS embed and one dedicated responder for the first two weeks. Don't overthink the tool choice at launch, get something live, watch how visitors actually use it, then refine.
If you have genuine data-residency requirements, sort out your self-hosted approach before you install anything, retrofitting compliance after launch is far messier than planning for it upfront.
Keep automation minimal at the start. A single canned response for your most common question and a clear "away" message will outperform an elaborate bot flow nobody's tested. Add complexity only once your metrics tell you where the gaps actually are, not before.
— Gabbi
Get your site and chat sorted in one go
If reading through install paths, plugin quirks and caching issues has you wanting a shortcut, that's exactly what aceSites is built for. Rather than juggling a separate chat vendor, a plugin, and a site that wasn't quite ready for either, aceSites gets you a professional, mobile-ready site live in under a day, with chat, contact forms and booking widgets ready to embed from day one.
No hidden costs, no waiting weeks for a developer, just a straightforward platform built for service businesses who'd rather focus on customers than code. Head to the AI website builder to see how quickly your own site could be live, or check the done-for-you option if you'd prefer aceSites to handle the whole build, chat included.
Sources
- Create a live chat
- How to Add Live Chat to Website in 10 Minutes 11 Steps
- Web Chat
- Rotate OAuth2 secret (Salesforce developer guidance)