
Embedding Calendly directly on your site is the fastest way to turn visitors into bookings. Instead of sending people to an external link, you keep them on your domain and let them book in seconds. For most small businesses, the pop-up widget is the best starting point: it floats on every page, stays visible as visitors scroll, and requires no layout changes. If you have a dedicated booking page, use the inline embed instead. Either way, the whole process takes under five minutes and works on the free Calendly plan.
Here is the short version of how to add Calendly to your website:
- Go to your Scheduling page in Calendly.
- Click the three dots (•••) next to the event type or landing page you want to embed.
- Select Add to website.
- Choose your embed type (inline, pop-up widget, or pop-up text).
- Adjust any basic settings, then click Copy code.
- Paste the snippet into your site's HTML or builder block.
Pro Tip: Test the embed in an incognito browser window after publishing. This clears cookies and shows you exactly what a first-time visitor sees, including any cookie consent prompts.
Colour customisation and button text changes require a paid Calendly plan. Basic options, including hiding the cookie banner, are free. If you use Ace-sites, the platform supports custom HTML blocks, so you can paste your Calendly snippet straight in without touching a stylesheet.
Key takeaways
Embedding Calendly on your website takes under five minutes using the standard no-code snippet, and the pop-up widget is the most effective starting point for small businesses that want bookings from every page.
| Point | Details |
|---|---|
| Choose the right embed type | Use pop-up widget for site-wide CTAs; use inline embed on dedicated booking pages. |
| Get the code from Calendly | Go to Scheduling page, click ••• next to your event, select Add to website, copy the full snippet. |
| Colour customisation needs a paid plan | Free users can hide event details and the cookie banner; colours and button text require an upgrade. |
| GDPR cookie obligation remains | Hiding Calendly's cookie banner does not remove your UK data protection duties; your consent tool must cover it. |
| Ace-sites supports custom HTML | Paste your Calendly snippet into an Ace-sites Custom HTML block, publish, and test on mobile and desktop. |
Official docs and helpful links
The sources below are the primary references for everything covered in this guide. Use them when you need the exact current code snippets or feature details.
- How to add Calendly to your website — the official step-by-step guide covering all embed types and the copy-code process.
- Embed options overview — explains inline, pop-up widget, pop-up text, and landing-page embeds with use-case guidance.
- Advanced Calendly embed for developers — covers
Calendly.initInlineWidget,window.postMessageevent tracking, auto-resize, and iframe fallback. - How to customise your embed — lists what is available on free versus paid plans, including colour options and pop-up widget positioning.
- Calendly embed options by platform — platform-specific instructions for WordPress, Wix, Squarespace, Shopify, Webflow, and others.
Table of Contents
- Which Calendly embed type should you use?
- How do you get the Calendly embed code?
- How to add the Calendly code to WordPress, Wix, Squarespace, Shopify, Webflow and Google Sites
- Advanced embed options for developers
- What can you customise, and what needs a paid plan?
- Troubleshooting common Calendly embed problems
- How to embed Calendly on an Ace-sites website
- A practical view on embedding Calendly for UK small businesses
- Get a website that supports Calendly from day one
- Sources
Which Calendly embed type should you use?
Calendly offers three main embed options: inline embed, pop-up widget, and pop-up text. There is also a landing-page embed that displays multiple event types at once. Picking the right one depends on where you want the scheduler to appear and how much you want it to interrupt the browsing experience.
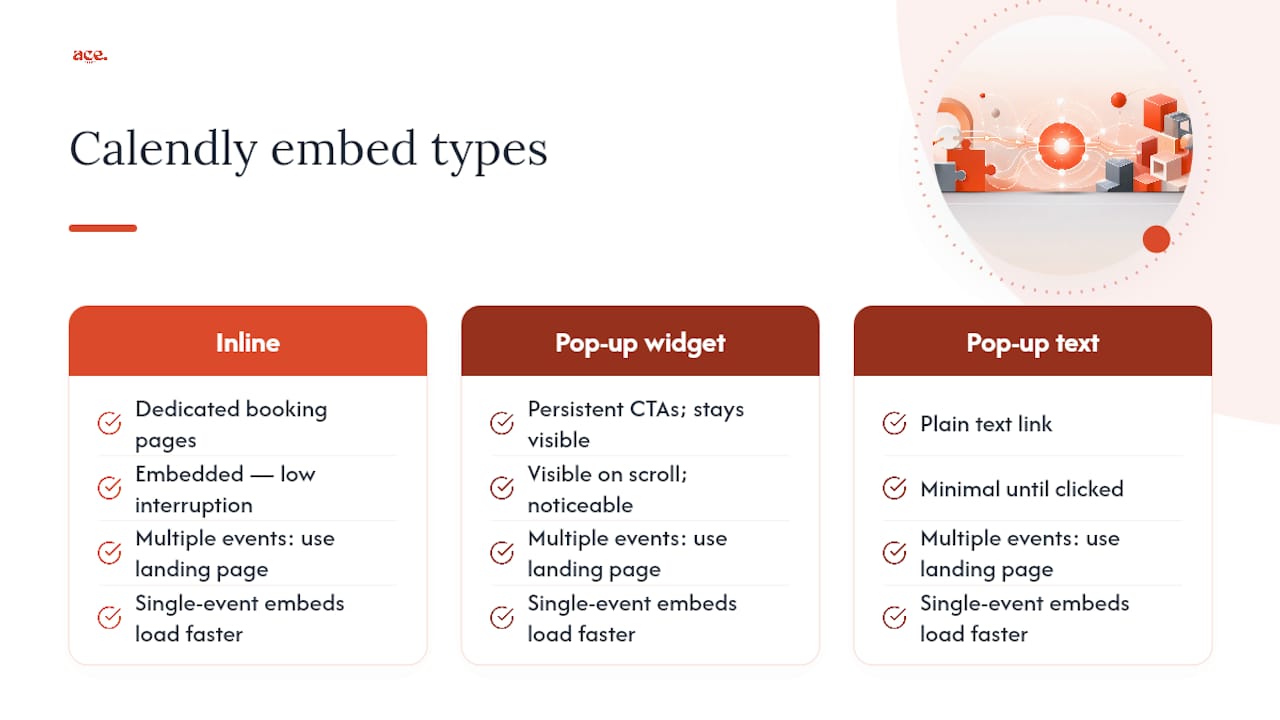
Landing page vs single event type: if you offer more than one service (say, a consultation and a follow-up call), embed your Calendly landing page so visitors can choose. If you have one clear offer, embed the specific event type directly. The single-event embed loads faster and removes a decision step for the visitor.
Accessibility and UX: whichever embed you choose, Calendly renders inside an iframe. Screen readers can navigate it, but you should add an aria-label to the container element so assistive technology announces the region clearly. Keyboard focus passes into the iframe correctly in modern browsers, though it is worth testing with a keyboard-only session before you publish.
On GDPR and cookies: Calendly sets cookies when the scheduler loads. Your site's cookie consent banner needs to account for this. Hiding Calendly's own cookie notice (a free option) does not remove your legal obligation to inform visitors under UK data protection rules.
Pro Tip: For small-business CTAs, the pop-up widget consistently outperforms a plain text link because it stays visible as the user scrolls. Use inline only when you have a page built specifically around booking.
How do you get the Calendly embed code?
The steps below work for any embed type. Follow them exactly and you will have the right snippet in under two minutes.
- Log in to Calendly and open your Scheduling page.
- Find the event type or landing page you want to embed.
- Click the three dots (•••) to the right of its name.
- Select Add to website.
- Choose your embed type: Inline, Pop-up widget, or Pop-up text.
- Adjust the available settings. On the free plan you can hide event details and hide the Calendly cookie banner. On paid plans you can also change background colour, text colour, and button colour.
- Click Copy code.
- Paste the snippet into your page's HTML.
For a generic HTML page, paste the snippet just before the closing </body> tag. To test safely before publishing, paste it into a staging page or a local HTML file opened in your browser. Confirm the scheduler loads, then move it to your live page.
The difference between a landing-page embed and a booking-page embed is simple. A landing-page embed shows all your event types in one view. A booking-page embed goes straight to a single event's calendar. Use the landing-page code when you want visitors to pick a service; use the booking-page code when you want them to go straight to scheduling a specific appointment.
How to add the Calendly code to WordPress, Wix, Squarespace, Shopify, Webflow and Google Sites
Calendly's help centre covers all major platforms, and the process follows the same pattern everywhere: find the HTML or embed block, paste the code, save and preview. Here are the specifics for each builder.
WordPress
On WordPress.org (self-hosted), open the page or post editor, add a Custom HTML block, and paste the full Calendly snippet inside it. Preview the page before publishing. On WordPress.com, the Custom HTML block is available on paid plans. If you are on the free WordPress.com plan, add a public Calendly link as a button instead.
Wix
In the Wix Editor, click Add (+), go to Embed Code, and select Embed HTML. An HTML box appears on the page. Click Enter Code, paste the Calendly snippet, and click Apply. Resize the element to fit your layout. Note: in Wix Studio (the newer editor mode), the same element is found under Embed & Social.
Squarespace
Open the page in Squarespace, click the section where you want the embed, and add a Code block (not a text block). Paste the Calendly snippet into the code block and save. For pop-up types, you can place the code block in the page footer so it loads site-wide.
Shopify
In the Shopify admin, go to Online Store > Pages, open the page you want to edit, and switch the content editor to HTML view (the <> icon). Paste the Calendly snippet and save. For a site-wide pop-up widget, add the snippet to your theme's theme.liquid file just before </body>. If you are not comfortable editing theme files, use a Shopify app that supports custom code injection.
Webflow
In the Webflow Designer, drag an Embed element onto the canvas where you want the scheduler. Double-click it, paste the Calendly snippet, and click Save & Close. For a site-wide pop-up widget, go to Project Settings > Custom Code, paste the snippet in the Footer Code field, and publish.
Google Sites
Open your Google Site in edit mode. Click Insert > Embed, select the Embed code tab, paste the Calendly snippet, and click Next, then Insert. Resize the embedded frame on the canvas and publish the site.
Fallback for restricted CMS: if your platform does not allow custom HTML (some free plans block it), add a clearly labelled button that links directly to your public Calendly scheduling page. It is less elegant but fully functional.
Quick testing checklist before you go live:
- View the page on a desktop browser and confirm the scheduler loads.
- Check on a mobile device or use browser developer tools to simulate a small screen.
- Open an incognito window to test the first-visit cookie experience.
- Clear cookies and reload to confirm the consent flow works correctly.
Advanced embed options for developers
Standard embed options cover most small businesses. When you need to pass dynamic data, track booking events in your analytics, or build a custom UI around the scheduler, the Calendly JavaScript API gives you the control to do it.
Initialising an inline widget with JavaScript
Instead of the static HTML snippet, call Calendly.initInlineWidget after the Calendly script has loaded:
Calendly.initInlineWidget({
  url: 'https://calendly.com/your-username/event-type',
  parentElement: document.getElementById('calendly-container'),
  resize: true
});
Set resize: true to let the widget adjust its height automatically. This only works reliably when the container holds no other complex interactive elements such as dropdowns or routing forms. If the container includes those, auto-resize can cause layout shifts, particularly on mobile. Test on real devices, not just browser emulation.
iframe fallback
When JavaScript is not suitable (some CMS environments strip scripts), use a plain iframe:
<iframe src="https://calendly.com/your-username/event-type"
Pre-filling invitee information
Append query parameters to the Calendly URL to pre-fill the invitee's name and email:
?name=Jane+Smith&email=jane@example.com
This is useful when the visitor is already logged in to your site and you want to skip the data-entry step. Only use it when you have a lawful basis for passing that data, in line with UK data protection requirements.
Event tracking with postMessage
To confirm a booking has been made and fire a conversion event in Google Analytics or your CRM, listen for window.postMessage events from the embed:
window.addEventListener('message', function(e) {
  if (e.origin === 'https://calendly.com' && e.data.event === 'calendly.event_scheduled') {
    // fire your analytics event here
  }
});
Always verify the event origin equals https://calendly.com before acting on the message.
When to bring in a developer: if you need to pass dynamic user data from a logged-in session, integrate booking confirmations with a CRM in real time, or build a fully custom scheduling UI, that is the point to call in professional help. The standard embed handles everything else.
What can you customise, and what needs a paid plan?
Calendly's customisation options split clearly between free and paid. Knowing the boundary saves you time.
Free plan users can:
- Hide event details from the embed view.
- Hide the Calendly cookie banner within the embed.
- Choose between embed types (inline, pop-up widget, pop-up text).
Paid plan users can also:
- Change the background colour of the embed.
- Change the text colour.
- Change the button colour and button text.
- Remove Calendly branding from the embed.
The pop-up widget defaults to the bottom-right corner of the screen. If that position clashes with a live chat bubble or a cookie consent banner, add a CSS rule to your stylesheet to shift the widget's position using left and right offset values.
Performance: embedding Calendly adds a third-party script and iframe to your page. Load it over HTTPS (non-negotiable for both security and browser trust), and place the script tag near the closing </body> tag rather than in the <head> so it does not block page rendering. On slower connections, the scheduler may take a moment to appear; this is normal, but worth monitoring if your Google PageSpeed score matters to you.
Accessibility best practices:
- Wrap the embed container in a
<div>withrole="region"andaria-label="Book an appointment". - Test keyboard navigation through the scheduler.
- Run a screen reader check (NVDA or VoiceOver) to confirm the iframe is announced correctly.
A critical legal point: hiding Calendly's cookie banner from your embed does not satisfy your UK data protection obligations. Your site's own consent mechanism must account for the cookies Calendly sets. If you use a consent management platform such as Cookiebot or OneTrust, check that Calendly's cookies are categorised and blocked until consent is given.
Troubleshooting common Calendly embed problems
Most embed issues come down to one of four causes: a missing script tag, a browser blocking the iframe, a CSS conflict, or a content security policy (CSP) restriction. Work through the list below before assuming the embed is broken.
Scheduler not loading:
- Open your browser's developer console (F12) and check for errors.
- Confirm both parts of the Calendly snippet are present (the stylesheet link and the script or div).
- Check the scheduling URL in the snippet is correct and publicly accessible.
- Confirm the page is served over HTTPS. Calendly will not load on HTTP pages.
- Look for a Content Security Policy header that blocks
calendly.com. If found, addcalendly.comto theframe-srcandscript-srcdirectives.
Pop-up blocked by browser:
- Pop-up text and pop-up widget types open in a modal overlay, not a new browser window, so standard pop-up blockers do not affect them. If the modal is not appearing, check for a JavaScript error in the console or a CSS rule setting
display: noneon the Calendly container.
CSS conflicts hiding the widget:
- Inspect the Calendly container element in your browser's developer tools. Look for
overflow: hidden,z-indexconflicts, orheight: 0applied by your theme. Override these in your stylesheet with a more specific selector.
Mobile and responsive issues:
- Set the inline embed container to
width: 100%and a fixed minimum height (at least 630px works for most event types). - Auto-resize (
resize: true) only works when no other interactive elements share the container. If you see layout shifts on mobile, remove auto-resize and set a fixed height instead.
Confirming postMessage events are received:
- Add a temporary
console.log(e)inside your message listener and open the console while completing a test booking. You should see acalendly.event_scheduledevent logged when the booking confirms.
How to embed Calendly on an Ace-sites website
Ace-sites supports custom HTML blocks, so adding a Calendly scheduler takes the same steps as any other HTML-capable builder. Here is the exact process.
Steps for Ace-sites users:
- Copy your Calendly embed code using the steps in the "How do you get the Calendly embed code?" section above.
- Open the Ace-sites page editor for the page where you want the scheduler.
- Add a Custom HTML block to the page at the position you want the embed to appear.
- Paste the full Calendly snippet (both the stylesheet link and the script or div) into the block.
- Save and preview the page in the editor.
- Publish the page.
Testing checklist for Ace-sites users:
- After publishing, open the live page on a desktop browser and confirm the scheduler loads.
- Switch to a mobile view (or use a phone) to check the embed is responsive.
- Confirm your site's SSL certificate is active (the padlock in the browser bar). Ace-sites includes SSL on all plans, so this should be in place automatically.
- Check your cookie consent setup covers Calendly's cookies.
- Complete a test booking end-to-end to confirm the confirmation email arrives.
Ace-sites is a practical fit for small businesses that want booking embeds without the overhead of a custom-built site. The platform handles SSL, mobile-optimised templates, and built-in SEO tools. You can focus on the embed itself rather than the surrounding infrastructure. You can see real business websites built on Ace-sites to get a sense of how embedded booking widgets look in live sites.
Pro Tip: Place your Calendly pop-up widget snippet in a site-wide footer or global code area in Ace-sites so it appears on every page without you having to add it to each one individually.

A practical view on embedding Calendly for UK small businesses
The biggest mistake I see small business owners make is overthinking the embed type. They spend time reading about JavaScript APIs and iframe fallbacks when a standard pop-up widget, copied and pasted in two minutes, would do the job perfectly.
Start with the pop-up widget for any page where booking is a secondary action (a services page, a homepage, a blog post). Switch to an inline embed only when you have a page whose entire purpose is to get visitors booked in. That distinction alone will save you an afternoon of tinkering.
On the practical side: keep your Calendly calendar hygiene tight. An embed is only as useful as the availability it shows. Block out buffer time between appointments, set realistic lead times, and connect Calendly to your Google or Outlook calendar so double-bookings cannot happen. Visitors who hit a wall of unavailability will not come back.
For measuring success, track the calendly.event_scheduled postMessage event and pass it to Google Analytics as a conversion goal. That gives you a direct line between your embed and your actual bookings, which is far more useful than page views alone. If you use a CRM, most integrate with Calendly directly, so new bookings can create contacts automatically without any developer work.
Get a website that supports Calendly from day one
Embedding a scheduler is straightforward when your website platform supports custom HTML. Ace-sites does exactly that, and it handles the surrounding infrastructure too: SSL certificates, mobile-optimised templates, and built-in SEO tools are all included as standard.
For small business owners who want to go live quickly without hiring an agency, Ace-sites offers:
- Custom HTML block support so you can paste any Calendly embed code directly.
- Built-in SEO tools to help your booking page rank in local search.
- Mobile-optimised templates that keep the scheduler looking right on every device.
- Optional done-for-you service where the Ace-sites team builds and configures the site for you, including embed setup.
If you would rather have someone else handle the technical side, the done-for-you website service covers the full build. You see the finished site before you pay a penny.
Sources
- How to add Calendly to your website | Calendly Help
- Embed options overview | Calendly Help
- Advanced Calendly embed for developers | Calendly Help
- How to customize your embed | Calendly Help
- How to add scheduling to your website with Calendly | Calendly